


Online shop
- Flexible CIGS solar panels
- Semi-flexible Solar Panels
- Rigid Frame Solar Panels
- Folding Solar Panels
- Semi-flexible Solar Kits
- Rigid Frame Solar Kits
- Dual Battery Solar Kits
- Solar Charge Controllers
- Wind Power
- Inverters
- Batteries
- Battery Chargers & Monitors
- Portable Power Stations
- Vehicle Power Management
- Complete Renewable Systems
- UPS Systems
- Solar Lighting Systems
- Cable
- Accessories
- Discounted Items
Didn't find products you were looking for?
Tell us about them! We might have these products in stock, but not on the website, or may be we are planning to restock them soon.
Testimonials:
Great product....really impressed with how much light the 25W system produces
Richard (Liskeard, Cornwall, UK) - Oct 2017
We are a trusted supplier to thousands of UK clients
Articles
Simple Step-by-step Wiring for Photonic Universe Solar Power System
Setting up our kits is easy when you know how! Here is your straight-forward, instructional guide to wiring the different components of your Photonic Universe solar power system together in only 3 steps.
(You may need: cable cutter, screwdriver, battery ring terminals, inline fuse, isolator switches)
1. Connect your Photonic Universe leisure battery to your solar charge controller
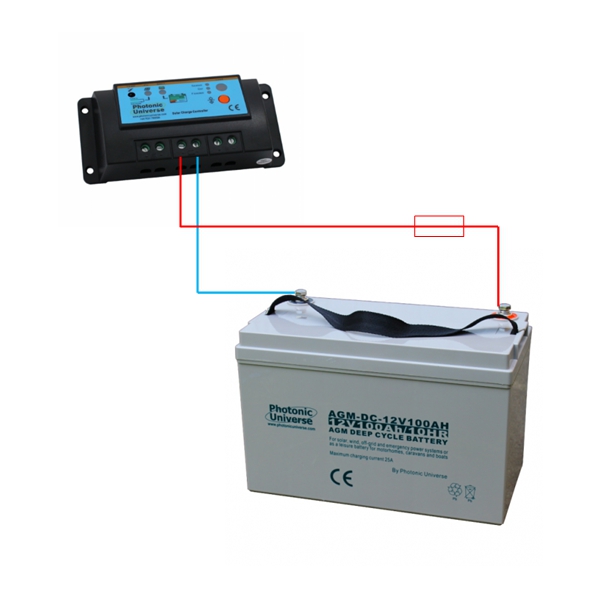
Using a twin core battery cable with appropriate cross section and an inline fuse (max. 15cm distance from the battery), connect your 12V battery to the battery terminals of the solar charge controller.
Make sure that the positive (+) battery terminal is connected to the positive (+) terminal on the controller and do the same with the negative (-) terminals. You can hardwire the cables onto the battery terminals, use ring terminals or for temporary connections use crocodile clips. If the fuse is in, upon connection the solar charge controller will instantly recognise the battery as 12V and switch the battery light on.
(Note : Some controllers can also work with 24V batteries, so, it is important that the battery has some charge so that the controller can determine the battery voltage correctly.)
2. Connect your Photonic Universe solar panel to your solar charge controller
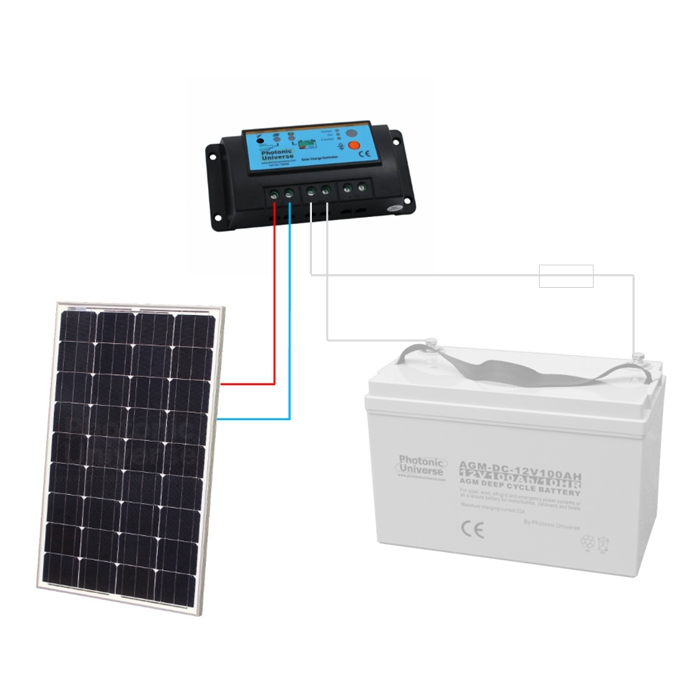
Connect the positive and negative solar panel cables to the solar (or PV) terminals on your solar charge controller. Again, make sure that the positive (+) cable connects to the corresponding positive (+) terminals on the controller and the same with the negative (-) terminals. If the solar panel is exposed to some light, the solar charge controller will immediately show a ‘battery charging’ signal.
Most of our Photonic Universe solar panels have MC4 connectors on the ends of the solar panel cables. These are for connecting several panels together easily. As the solar charge controller has screw terminals, these can be simply snipped off and the bare cable threaded into the screw terminals.
(Note: Some solar charge controllers will be a bit more complex, for example a dual battery solar charge controller is able to charge independent engine and leisure batteries from the same solar panel, but these wiring steps will always be required.)
3. Connect your Photonic Universe inverter to your battery terminals
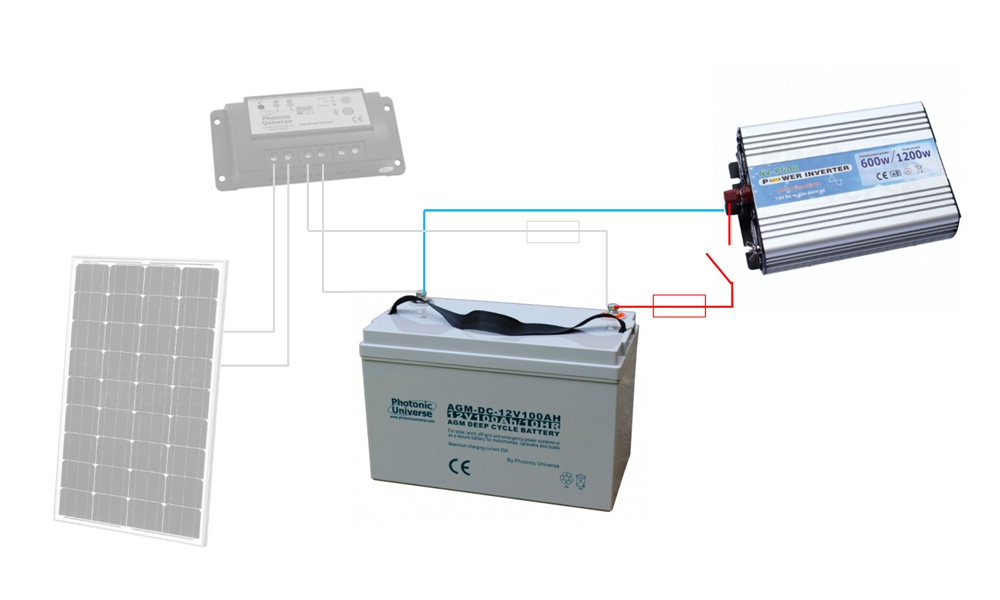
If you require 220-240V AC power for your every-day household appliances, then you will need to connect your Photonic Universe power inverter to your battery. As always, make sure that the positive (+) cable connects to the corresponding positive (+) terminals on the battery and the same with the negative (-) terminals.
(Note: The cables that come with the inverter are rated to the size of the inverter and should be used. If you require a longer length cable, the thickness of the cable might need to increase also. The inverter fuse and the heavy duty isolator switch shown in the diagram, are not included with our inverters).
Now you are ready to start your solar adventure!


